roman.kazicka@agnicoli.org
+421.918.901.732
  • Systémové myslenie v IT a Digitálna Fabrikácia
      • 2017-2018
      • 2018-2019
          • 2018-2019-Študenti
      • 2019/2020
          • Študenti
          • Projekty
              • 2019_P01
              • 2019_P02
              • 2019_P03
              • 2019_P04
              • 2019_P05
              • 2019_P06
              • 2019_P70
              • 2019_P08
              • 2019_P09
      • 2020/2021
          • 2020/2021-Studenti
          • 2020/2021-Projekty
      • 2021/2022
          • 2021-2022-Študenti
          • 2021-2022-Projekty
      • 2022/2023
          • 2022/2023-Studenti
          • 2022/2023-Projekty
      • 2023/2024 2023/2024
  • Prednášky
  • Systémové myslenie pri tvorbe IoT riešení
  • Kurzy
  • Workshopy
  • Kybernetické riešenia - Kybernetickým spôsobom
      • Finančná gramotnosť v inteligentných riešeniach-úvod
  • Nachádzate sa tu:  
  • Systémové myslenie v IT a Digitálna Fabrikácia
  • 2020/2021
  • 2020/2021-Projekty

2020/2021-Projekty

P07-2020-Automated Tea Infuser

Hodnotenie používateľov: 5 / 5

 Links

P07-Automated Tea Infuser Documentation

Automated Tea Infuser on Wikifactory

P07 - Automated Tea Infuser

p07 tea infuser final

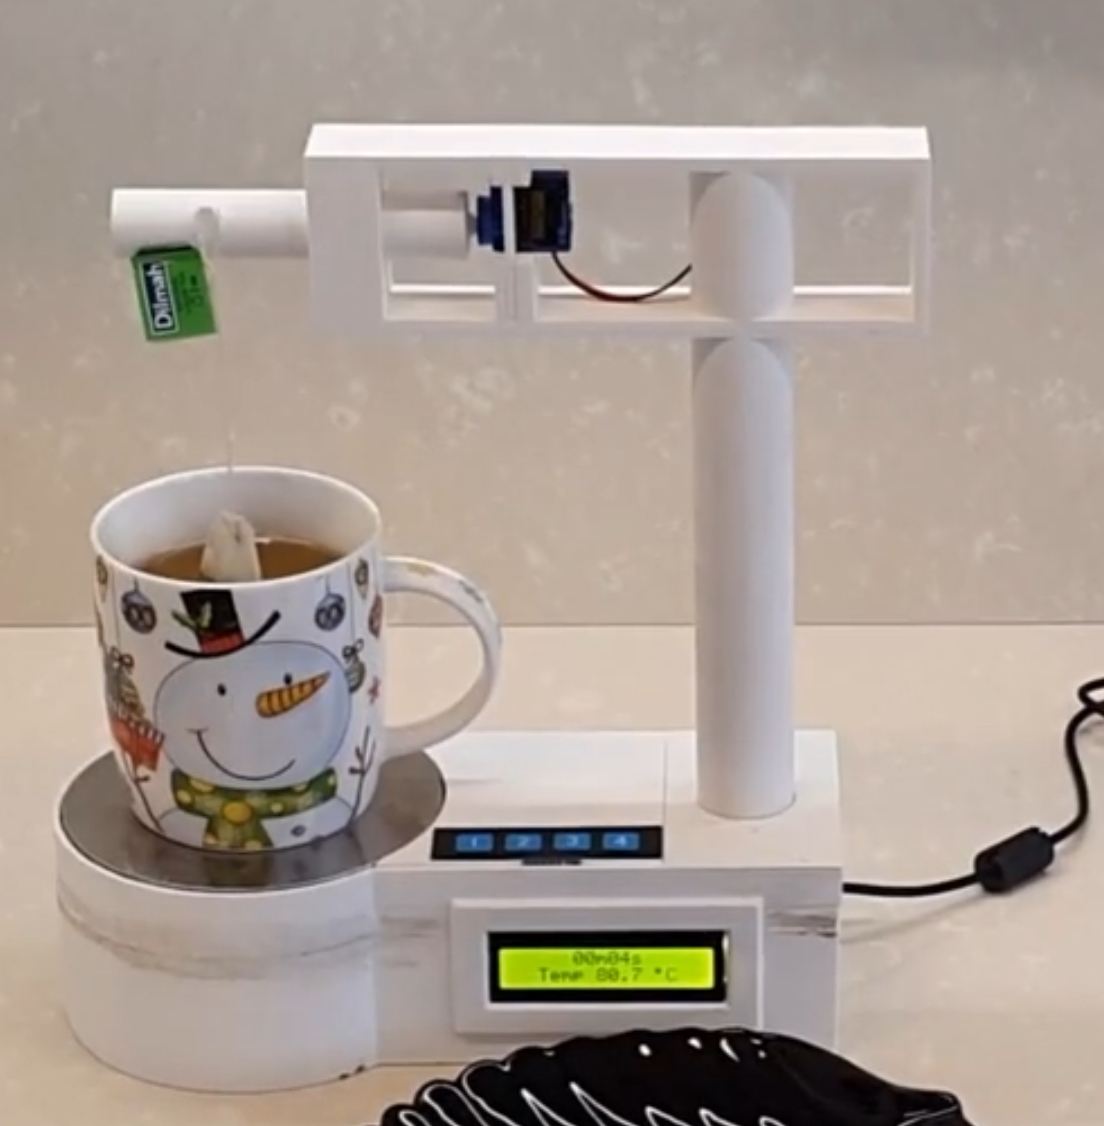
As part of a semestral project, we decided to build an automated tea infuser.

The need for a such device stems from the diversity of the different types of tea and, of course, the individual preferences for tea infusing.

One of the possible use cases occurs in a situation where the user forgets to pull out the tea bag after a certain time. This is an unpleasant situation, where in most cases the user is disgusted and unnecessarily wasted, as the user does not like the brewed tea, or the tea is too strong, which is caused by the high degree of brewing.

The second use case is usability and convenience when using an automated infuser. A common scenario is a situation where the user is in time distress. It is necessary not only to pour hot water over the tea, but also to guard the time needed for brewing. This creates an unpleasant situation where the user, most often in the kitchen environment, is dependent on an approximate time tracking via an analogue clock, as the smartphone with a timer may be in another room. At the same time, keep in mind that the time constraint increases every minute. Time tracking thus increases the user's aversion to the activity and reduces the overall enjoyment of the beverage preparation.

Another use case may involve a situation where the user pours the tea but forgets about the tea.

It is also necessary to keep in mind the wide range of tea enthusiasts who need to know the water temperature and set the exact brewing time when preparing tea.

The proposed embedded system would be able to cover all these use cases, while allowing users to set the tea brewing time, after which the tea bag would be automatically removed from the cup. At the same time, after removing the bag, the embedded system would notify the user to end the tea brewing. In addition, during the process, the embedded system would show the cup temperature on the display.

Requirements specification

The requirements specification section summarizes the functional and non-functional requirements for the resulting embedded system.

Functional requirements

  • the embedded system should allow the user to set the timer value in 10-second increments,
  • the embedded system should allow both the increase and decrease of the timer value during the timer setting process,
  • the embedded system should load the cup temperature at regular intervals and display it on the LCD display,
  • the embedded system should update the timer value at regular intervals and display the number of minutes and seconds remaining on the LCD.
  • the embedded system should ensure that the tea bag is removed from the cup after the timer expires,
  • the embedded system should notify the user using an audible notification when the timer expires, and the tea bag is removed from the cup.

Non - functional requirements

  • the embedded system should be robust enough to withstand incorrect user input,
  • the embedded system should be safe enough so that the user does not suffer any damage to health or property as a result of its use,
  • the embedded system should be usable by the user, the individual actions should be sufficiently predictable and easy to use.

Components

The following components will be needed for the project implementation:

  • Microcomputer Arduino Uno Rev3

https://www.alza.sk/arduino-uno-rev3-d569244.htm

23,90€

  • LCD display 16x2 with yellow backlight and I2C module

https://techfun.sk/produkt/led-display-16x2-zlte-podsvietenie-spajkovany-i2c-modul/

4,90€

  • Keypad 4x1

https://techfun.sk/produkt/klavesnica-4x1-avr-4-klavesy/

0,90€

  • Non-soldering contact field (breadboard) 400 points

https://techfun.sk/produkt/nepajive-pole-400-bodov/

1,90€

  • Servo SG90

https://techfun.sk/produkt/servo-motorcek-sg90/

3,10€

  • Servo SG90 - 360° - continuous

https://www.hwkitchen.cz/9g-mikro-servo-motor-sg90-360-kontinualni/

4,71€

  • Active buzzer on board

https://techfun.sk/produkt/aktivny-buzzer-na-doske/

1,50€

  • LM35 temperature sensor

https://techfun.sk/produkt/teplotny-snimac-lm35-samostatne/

1,80€

The total amount for the components needed to implement a functional prototype is 42.7 € excluding shipping costs and a 9V AC-DC power adapter that we have available.

Besides components, the following material is required for implementation:

  • Jumper cables M-F
  • Jumper cables M-M
  • Insulation material
  • Tin solder
  • Resistor set

Also, for the implementation of the project, it is advisable to have a soldering iron or a soldering station.

Libraries

Wire.h

The library allows you to communicate with the I2C bus. In firmware, it is only used during I2C bus scanning.

LiquidCrystal_I2C.h

The library is used to control the LCD display connected via the I2C bus. The interface is similar to the standard LiquidCrystal library. Working with the library is simple and allows the use of displays of various sizes, the size of which must be set when initializing the library.

Keypad.h

The library allows you to work with the keyboard. As with the LCD library, a keyboard of various sizes can be used with the Keypad.h library.

Servo.h

To work with the servo drive, we decided to use the Servo.h library, which greatly simplifies the work. For proper operation, it is necessary to connect the drives to the PWM outputs of the microcomputer.


 Links

P07-Automated Tea Infuser Documentation

Automated Tea Infuser on Wikifactory

  • Návštevy: 1092

P11-2020 Smart brewery

Hodnotenie používateľov: 4 / 5

Čítať ďalej: P11-2020 Smart brewery

  • Návštevy: 836

P12-2020 - EA tutorials for beginners using ActivePresenter

Hodnotenie používateľov: 4 / 5

Links:

link EA - link on EA repository

linkEA EN version - link on EA repository EN

good tutorial for ActivePresenter for beginners - 

EA tutorials for beginners using ActivePresenter

Bc. Kamil Macek (S12) , Bc. Jozef Olejník (S16)

SMVIT, Winter term 2020/2021, FIIT STU

Project description

Create a series of short videos (tutorials) on your chosen topics related to working with EA using ActivePresenter tool. Make sure the videos are easy to explain (this will ensure that the videos are easy to understand even for complete beginners).

Motivation

Getting started with EA can be difficult, as it is complex software with many difficult-to-understand features. Therefore, we decided to create an educational tool aimed at understanding working with EA on the subject of SMIT represented by a series of videos in the ActivePresenter tool, which can simplify this initial work with EA and we can avoid discouraging the use of this tool.

We also belong to the category of people who feel stress when working with EA, and by creating this project we have the opportunity to learn to work with EA better, we would also like to get more similar and try working with ActivePresenter tool.

actve preslogo EA1 1024x332 1024x332

Goal

The goal of the project is to create a series of 8 videos dealing with basic UC executable in EA during the initial work with this tool.

  • Create simple videos to support working with EA
  • thanks to simple and short videos, we will try to attract followers to work with EA
  • motivate followers to expand our idea, in the form of motivation to use the ActivePresenter tool to expand this tutorial and a wider range of topics available to the public
  • try to keep one video in the range of 2-10 minutes to ensure full concentration of the viewer

In terms of complexity, these videos will be about the basic functionalities presented in the form of educational videos, as we ourselves are beginners in this area.


Analysis

It will be using as an introduction to the EA tool, the creation of diagrams and the possibilities of EA communication.

What do we need for the implementation of the project:

1) EA tool

2) ActivePresenter tool

3) List of topics of individual tutorials

Characteristics of videos:

  • video range will be shorter (range 2-10min)

  • simple

  • concise

  • dealing with some problem with working in EA

  • each video consists of an introductory page that describes what the video will be about and then continues the illustrative solution of the problem

  • information windows (type click here, write it ..) are also uniform, thanks to the ActivePresenter tool.

Project solution procedure:

1. installation of ActivePresenter and Enterprise Architect tools

2. Familiarize yourself with ActivePresenter

3. Define video themes

4. independent work with EA within the topics, understanding of the problem and its solutions

5. recording individual videos

6. making videos available to public


List of videos

1) Tutorial 1 - How to setup connection to model and create shortcut

available also as video - Tutorial 1 - video

2) Tutorial 2 - How to setup universal workspace

available also as video - Tutorial 2 - video

3) Tutorial 3 - How to communicate in Enterprise Architect

4) Tutorial 4 - How to create new project and generate class diagram from source code

5) Tutorial 5 - How to see latest changes in model & how to see edit history for specific diagram (audit)

6) Tutorial 6 - Generate documentation (pdf)

7) Tutorial 7 - Where to find your actor & creating simple 'about me' diagram

8) Tutorial 8 - How to create simple BPMN diagram


Fotodocumentation

w3

vcvc

e1
143506608 754662778492006 6495586935612932862 n


Evaluation

We evaluate this project very positively, as we also had the opportunity to immerse ourselves more in working with EA and try the ActivePresenter, which is very useful tool. We had the opportunity to learn how to work with an active presenter tool, and finally we have a little more motivation to work in EA tool.

Some videos are similar to yours, and we motivated ourselves to try using the active presenter on those similar videos. Later on, we did our tutorial.

We think it's quite useful. Since the situation in the world is as it is, we are glad that we did not go with a hardware project, because it would be quite difficult to harmonize and create something functional and useful. We firmly believe that after the end of the COVID19 pandemic, we will have the opportunity to try out the technologies in FABLAB.

Lessons learned

At the beginning, we had weak experience working at EA, but we can say that by creating these videos, we are more motivated and inspired to work with EA now.

We also focused on modeling, not only on setup and work within the subject, as we are also interested in creating diagrams, and for example, EA is often used in the real jobs, so we can use EA tool in the future.

For the first time we tried to create a bpmn diagram and we liked how EA supports all the notations / diagrams, etc. We had the opportunity to see that EA keeps all changes, so we can go back to the changes we made. We also liked how to easily generate a class diagram from the code! :-)

We will definitely use the experience we gained in the future, whether at work or school, for example we can work with EA during the working on our diploma thesis, where we will definitely need to model the software in the analysis or design of the solution. We had the opportunity to see and try modeling with EA tool, it's really not so bad to use EA and it will only bring to you benefits in the future.

Next steps

  • extent the tutorial with more videos
  • modify of current videos
  • continue to inspire future SMVIT students to use these tools

  • Návštevy: 1336

P13-2020-Smart indoor glasshouse 

Smart indoor glasshouse 

  • Návštevy: 780

P14-2020 - Baby monitor

Links

  • Slides: Baby monitor
  • EA model: odkaz
  • Wikifactory: page
This smart baby camera solution concept can inspire and demonstrate the simplicity of creating your own device to meet user requirements.

Team Members: Jakub Mikolaj, Róbert Oros. 

Motivation

We came up with this idea because little babies were born in our families (and we believe that they will be born in the future) and we also think that this project would be suitable for our grandparents, when their monitoring is necessary in some health cases.

We also wanted to create something useful, what can be used daily in the care of a baby, animal, or something that should be monitored. Gain experience with 3D modeling, 3D tools and technologies like Arduino or Rasberry PI.

Existing solutions

Large amount of equipment and manufacturers
  • camera + display
  • camera + aplication
  • first mobil - camera + second mobile - aplication

existing.png

System functions

Our primary goal is not to differentiate ourselves from the competition but to create our own smart device. Based on the analysis of existing solutions, we have created a set of functionalities, that we expect from a baby camera.
System should record this parameters in real time:
  • Image
  • Sounds
  • Temperature
  • Humidity
In addition, the system will detect baby movement and notifying users.

Solution description

The most important component of baby monitor is control unit which will by drive all other elements. The control unit should be sufficiently powerful and compatible but at the same time small enough. Raspberry Pi best meets these requirements. The primary goal is to create a program that will provide an interface in which the user will be able to view records from the camera and hear sound. He will also be able to talk to the child Gradually, we will expand these basic functions with smart options such as motion and temperature measuring. The user will be notified of unwanted or unusual activities.

Components

The analysis showed that we will need these components to create baby monitoring:
Raspberry Pi 4 Model B
Raspberry Pi is a small single-board computer developed in the United Kingdom by the Raspberry Pi Foundation in association with Broadcom. It is the control unit of our entire solution
Price: 71.90 €
Link: https://www.alza.sk/raspberry-pi-4-model-b-4gb-ram-d5655286.htm
Sensor for temperature and humidity BME280
The BME280 device is a digital barometric pressure sensor and is a slightly upgraded version of the BMP180. This is available on a small module which provides access to the sensor via the I2C interface. This allows us to easily connect it to the Raspberry Pi and read the data using Python. The BME280 provides temperature, pressure and humidity.
Price 6.20 €
Link: https://techfun.sk/produkt/bme280-senzor-teploty-tlaku-a-vlhkosti-vzduchu/
Camera Microsoft LifeCam VX 1000 (we had it at home)
This camera also has a built-in microphone so it can captures both image and sound. It is connected with raspberry pi via USB.
Price: In amazon you can buy it for 37.75 €.
Link: https://www.amazon.com/Microsoft-64L-00003-LifeCam-VX-1000/dp/B000GE9XQ2
SanDisk microSDHC 32 GB
microSD card for operation system and Python script
Price: 8.39 €
Link: https://www.alza.sk/sandisk-microsdhc-32gb-ultra-android-class-10-uhs-i-sd-adapter-d5127465.htm
Total price for all components are 86.49 € (without price of camera). 

Proposal

When we make component analysis, we created a diagram of the hardware, on which we placed only the elements that we will need. We also created a sensor connection to specific pins there.
Hardware.JPG

A camera (that will capture the baby) can be positioned in two ways as needed. Directly on the cover of the device or mount on the bed.navrh.png


Implementation

The implementation is divided into four units. The first part is image, sound, humidity and temperature recording. The second part is streaming records using a server in the local wifi network. The third part is motion detection using machine learning methods. The last part is the notification of the user in case of exceeding the set threshold values
Record
The device records image and sound using an external webcam, example. Recording temperature and humidity using the BME280 sensor is easy to implement in python.
Streaming
Streaming of image, sound, temperature and humidity using a server in a local wifi network brings privacy and security benefits. Only devices connected to the wifi network can view the recordings. No need to use third party servers. The advantage is also viewing on several devices at the same time. An example of an implementation of a server capable of streaming video can be found in the example.
 stream.png
 
Movement detection:
Machine learning methods can be used to baby motion detection. A large number of articles dealing with the detection of the human figure are available on the Internet. Pre-trained models and python integration code that identify people are freely available for download example. Using such a model, we can identify the child on the screen.
Motion detection is determined by drawing a new frame. If the frame is redrawn, we detect motion. It is assumed that the sleeping child does not move consistently for a certain period of time. Consistent movement during X minutes indicates awakening.
detect.png
 
Notification:
User notification can take place in three ways:
  • SMS - Various SMS API services can be used for script sending SMS messages. For example twilio. These services are charged in most cases. An example of implementing python sms sending is available at this link
  • Email - Sending e-mails is unlike sending an SMS free of charge. Nowadays, most users are permanently connected to the Internet and the notification of received email is displayed immediately. An example of implementing sending email using gmail account in python language is available at this link.
  • Alarm in mobile - The notification will be displayed on the screen

3D modeling

For 3D model our case of Raspberry Pi 4 we used program Autodesk Fusion 360. First we download cad model of Raspberry Pi 4 and we create case around it.

1.JPG

We need to cut holes for all inputs to Raspberry Pi (USB-C, USB, HDMI, micro HDMI, SD card...). At the bottom we created four pins for ensuring Raspberry Pi 4 against movement.

2.JPG

We split the case in half, to bottom and top part and also we created snap joints to hold the top and bottom parts together.

3.JPG

We realized that we also need holes for connecting the sensor (its cables) to GPIO pins header and also that I need to somehow connect the sensor to the raspberry pi. We did not want to put it inside the package so that the temperature was measured correctly.

4.JPG

Since raspberri pi can overheat, we have created the inscription "Baby Monitor", which can also be used to ventilate hot air. Lastly we created a camera holder (only for our camera type – Microsoft lifecam vx 1000 what we found at home).

5.JPG

View into our case of Raspberry Pi 4:
6.JPG 
You can find our entire model as well as the model without a camera holder at the following links:
Model of case for Raspberry Pi 4 with camera holder
Model of case for Raspberry Pi 4 without camera holder

Links

  • Slides: Baby monitor
  • EA model: odkaz
  • Wikifactory: page


  • Návštevy: 1039

P19-2020 Arduino mini game console

Arduino mini game console

Link to the EA project

Motivation

Our goal was to create smallest posible game console for gamers who want to play their favorite retro games whenever they want. In this project we created PCB design and scheme and and 3d model for Arduino micro based game console. At creating we aimed for small dimensions and good usability.

Design

Users

We aimed for users of all ages who want to play their favorite retro games.

Functional requirements

  • ability to run retro games.
  • rechargeability.

Non-unctional requirements

  • Small dimension.
  • Long battery life.

PCB scheme

 Bez_názvu.png

PCB design

Pcb_Design.png

Description

The red lines show the wires connected to the printed circuit board (dps).
The battery is not part of the board and is connected by wires to the board.
The loudspeaker in the lower right corner is actually smaller than designed and therefore does not overlap with the button or the anchor hole.
The display is actually larger than designed and is located at the level of the board and is connected to it by wires.
The dimensions of the board are 38x43x2 mm.

Box design

Disassembled

dsfsfdws.png

Assembled

dsfsfdws.png

Components

Needed components

• 6 pcs button on the board
• 1 three-position switch
• 1 speaker for a flat board with a cross-section of 10 mm
• 1pc 0.96 “7 PIN SPI display
• 1pc USB C female
• 1pc battery 3-5V with dimensions up to 32x21x5mm
• 1pc Pro Micro Microcontroller
• 4pcs Screw with dimensions 2x15

Cost of components

 
Part Quantity Price (€)
Battery 1 5
Buttons 6 2.5 (0.5 pcs)
Microcontroller 1 10
Switch 1 2.5
USB C 1 1.5
Speaker 1 5
Display 1 10
Screw 4 0.1 (0.25 pcs) Total 36.6

Manual

1. Printing printable parts according to the enclosed models.
2. Production or ordering of the board according to the attached design.
3. Soldering the components in their place on the PCB according to the design.
4. Glue the battery, switch and USB C input in place in the box

 iuytrew.png

5. Insert the buttons at the top of the box
6. Insert the board into the box
7. Close the box
8. Screw on the box

Game instalation

Insert games into the console
• Open Arduino IDE> File> Preferences
• Enter the URL in the Additional Boards Manager URL and press OK.
o URL: https://github.com/MrBlinky/Arduboy-homemade-package
• Go to Tools> Boards> Boards Manager.
• Write homemade or Arduboy homemade in the text box.
• Select Arduboy Homemade package and press Install.
After installing the libraries go to the Tools menu and select the following:
• Board: Homemade Arduboy
• Bootloader: Cathy3K
• Based on: SparkFun Pro Micro 5V - Alternate Wiring
• Core: Arduboy optimized core
• Display: SSD1306
Games can be downloaded from: https://community.arduboy.com/c/games/35.
Open the .ino file and press upload.

Game examples

Dungeon crawler

696c1ee3fd5146081d33205b8f522f0b5dbab47d.png

packman like

1248257.png


  • Návštevy: 819

Strana 2 z 2

  • 1
  • 2


© 2023 by JoomLead. All rights reserved.
  • Systémové myslenie v IT a Digitálna Fabrikácia
    • 2017-2018
    • 2018-2019
      • 2018-2019-Študenti
    • 2019/2020
      • Študenti
      • Projekty
        • 2019_P01
        • 2019_P02
        • 2019_P03
        • 2019_P04
        • 2019_P05
        • 2019_P06
        • 2019_P70
        • 2019_P08
        • 2019_P09
    • 2020/2021
      • 2020/2021-Studenti
      • 2020/2021-Projekty
    • 2021/2022
      • 2021-2022-Študenti
      • 2021-2022-Projekty
    • 2022/2023
      • 2022/2023-Studenti
      • 2022/2023-Projekty
    • 2023/2024 2023/2024
  • Prednášky
  • Systémové myslenie pri tvorbe IoT riešení
  • Kurzy
  • Workshopy
  • Kybernetické riešenia - Kybernetickým spôsobom
    • Finančná gramotnosť v inteligentných riešeniach-úvod